If you are not new to the Capcut video editing app you’d know that there are a lot of things you can do on the editing app. And in this article, we will only focus on how to blur on Capcut. If you are sharing sensitive information on your video you’d need the Capcut blur effect to cover up sensitive parts of your video before sharing them.
While this is easy and straightforward, it can be frustrating if you don’t know how to go about it and how you can easily identify the blur effect on the editing app. So, at the end of this article, you should be able to learn how to blur a video on Capcut on Android, iPhone and Windows.
How to Blur a Video on Capcut
Adding a blurring effect to a video on Capcut is quite easy and direct. However, it is a bit technical when you want to blur video on Capcut with a moving face. With this, you will need to keyframe your video and adjust the blur effect as the face movies. So, here you will learn how to blur on Capcut whether the face/object is moving or not on your Android
- Upload the video with sensitive information.
- Split the sensitive part and click on copy to duplicate it.
- Choose an overlay to drag and choose the effect.
- Go back to the main interface without selecting any video.
- Click on “Effects.”
- Allow the “Pop Notice” to allow Capcut to add effect to your video or not.
- Click on “Video Effects.”
- Scroll through the navigation and click on “Nightclub.”
- Scroll and click on “Blur.”
- Click on “Adjust” on the blur effect option.
- Increase the “Blur Preset” to 100% and save the changes.
- Click on the “Object” tab.
- Choose “Overlay” and save changes.
- Go out of the “Video Effects.”
- Click “Overlay.”
- Select the “Overlay” layer.
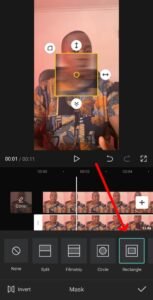
- Scroll through the app menu and choose “Mask.”
- Choose the perfect mask for your video. Here, we will go with the “Rectangle” mask.
- The “Rectangular Mask” will appear on your video screen.
- Drag the “Mask” and place it on your video’s sensitive part.
- Click on the “Save” button.
- Now, move out of the “Mask“ environment.
- Click “Overlay” >> Overlay video >> Mask.
- Use the down arrow “>>” to fade out or in on the mask to delete the black lines around the mask.
Now, with the step above the selected part of the video will be blurred. However, if the blur effect is not moving with the object you will have issues blurring the object when the blur object or face is moving around.
How to Blur a Video on Capcut
With the steps below you will be able to blur a moving object so that when the object moves the blur effect will move with the object. With this, you won’t have to bother about your sensitive page on your video.
- Add the “Blur Effect” to your video clip.
- Click on the “Overlay” clip.
- Click on the “Keyframe icon” next to the “Play” button.
- Move the video forward and add another “Keyframe.”
- Click on “Mask.”
- Adjust the “Mask” size and placement on the object.
- Tap “Keyframe.”
- Click ” Mask ” to adjust the blur coverage to the new position.
- Repeat this process until you add a keyframe and mask the entire video.
- Click on the “Play” button to make sure that the blur effect is done correctly.
Once you are satisfied with the blurring effect then you can import your video.


